Do It Yourself Kitchen Remodel, Can I Do It By Myself?, Or Not.
- Project Vision, Planning and Design (Cabinets, Flooring, Lighting, Appliances, Furniture)
- Fulfill Municipal Requirements (If Necessary ex. Architectural Drawings, Permits, and Product Specs.) At this point you decide if a professional is required.
- Here I would recommend writing a Scope Of Work to develop an order of execution. An Example of the order of execution is as follows:
- Demolition of the entire kitchen (Bag up unwanted debris)
- With walls open check all plumbing pipes and electrical wires.
- Spray foam any electrical or plumbing penetration in the top wall plate or bottom wall plate.
- Re-Install the new wall with DUROCK® or a mold resistant SHEETROCK® in the wet areas.
- Prep the floor to receive the new tile.
- Install new floor tile, grout and grout seal.
- Install new kitchen cabinets and countertop
- Install new or existing appliances
- Clean the kitchen and prepare for debut.
Now that we have put together a brief Scope of Work let's dive into each task more intricate look into each task at hand.
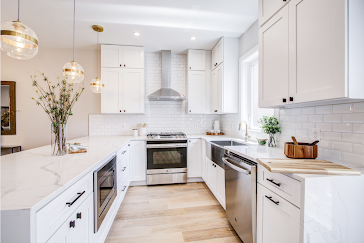
Project Planning: We begin at phase one of your project, which is the planning. Before you begin I recommend putting it on paper. When you write down your ideas, it's becomes better for you to form your Scope of Work. In this phase of your project you will be picking all of your finishes, let's start with the cabinets. You should first decide which color cabinet you prefer, this will be the basis for all the other finishes in the kitchen.Once you have decided on the cabinet color, then you can move on to the cabinet style. Next we move into the countertop, which type (Quartz, Granite, Concrete, Epoxy, Butcher Block). As you can see you have many options. With that let move on to the sink, and what type of sink you prefer (Farm Sink, Undercount, Top Mount, Deep, Shallow, 2 Full, 1 Full), again plenty of options. By now with all of these options, and there are many more, you can clearly see why the planning stage is important. Now deciding on flooring can be overwhelming, but necessary. With you knowing the cabinet color, you now have a basis for the floor and grout color, and also the material and design. At this point you can implement the lighting fixture selection, light switch types, and efficient or smart light bulbs. Last, but not least is your appliance selection. Very few renovators reuse the same fixtures, and if you choose new appliances , you want to know the product specifications and finish color.
Demolition: Before you start your demolition, I recommend putting up plastic visqueen so that you do not get dust or debris in other areas of your home. Check all of your plumbing pipe and electrical connections. If any of these items are in need of repair or replacement, I would consider hiring a professional if you feel this scope is beyond your purview. I would also recommend testing for lead paint if your are performing work on an older home (any home built before 1978). Always exercise safety by wearing a mask, goggles, gloves, and any other recommended PPE (Personal Protective Equipment).Contain all debris to one area if possible.
Wall Installation: When it comes to wall installations its pretty cut and dry, but there are still things that are commonly overlooked. Before you start to install the new wall, spray foam all plumbing and electrical penetrations to seal for air leakage and rodent infestation. VERY IMPORTANT: on the wall that are subject to getting water on them, I would recommend using DUROCK® or a mold resistant SHEETROCK®. Furthermore, I would put wood backing in the walls for the proper installation of the cabinets. Below is a video on how to properly install wood backing. Write down at which heights you placed your backing for future reference. After the backing is properly installed, you can proceed with installing the new wall material.
Flooring Installation: You must begin your flooring by preparing the existing floor for a new installation. This may include removing any existing installation material, nails or screws sticking out of the floor and sometimes floating the floor to make it even. Once the floor is fully prepared, you can begin by making sure you have the correct installation instructions for the tile material you are installing. The next step would be to square off and layout your floor properly. You can also decide at this time what size grout joint you would like. When mixing your thin-set, alway read the manufactures mixing instructions, as some manufacturers may have different instructions. The notch on your trowel will mostly depend on the type of tile material you are installing, but I would go with the recommendation of the distributor or manufacturer. When spreading thin-set, stick to 2'x2' sections (Depending on the tile size). Allow the finished floor to cure for a full 24 hours. And Lastly, mix your grout to the manufactures specifications, and if possible and in a sealant, because it's better at this time rather than later after the grout dries.
Cabinet Installation: On the subject of cabinets, before you begin installation, layout your base (bottom) boxes (cabinets sections are often referred to as boxes). With the heights you wrote down earlier, mark your screw holes on the back of the cabinet boxes. Carefully place your base (bottom) cabinets in to position, and double check level ( Shim as Needed). Once you have the cabinet placed in position and leveled, you can proceed to screw the cabinets to the wall. Now we move on to the upper boxes (Often referred to as wall cabinets). We start by measuring 19'-3/4" from the top of the base cabinet all the way around and strike a line. You must take time to make sure the line is level all the way around. After you establish a level line, screw a wood furring strip all the way around on the line. This is to provide support as you hang the wall cabinets. You can now place and screw your walls cabinets all the way around. Finally, you can install the doors, drawers, and handles or knobs.
Countertop Installation: You should have selected your countertop type and color in the planning stage. This section of the blog is going to short and simple. Unless you installing a formica countertop I recommend having this part of your project done by a professional. In most cases whom ever you decide to purchase the countertop from should provide installation services. Be sure to install the plumbing valves on the water lines before the countertop installation.
Kitchen Sink Installation: When it comes to the kitchen sink, there are many styles to choose from. One of the most popular sinks on the market today is the Farm Sink. The sink installation does not have a lot of instructions as do the other task. Once the countertop is set into position you can connect the plumbing apparatuses, and check for leaks. If a garbage disposal is to be installed, please refer to the manufacture installation instructions.
Kitchen Appliances: The kitchen appliances are easy, just like the countertop. When you decide on the exact appliances, and where they will be purchased from, you can arrange installation at that time. If you decide to install the appliances yourself, please refer to the manufactures installation specification.
Clean and Debut: Once you have completed all of your task, you should do a quick Scope Of Work check to ensure that all work is completed and to the satisfaction of your vision. Do a thorough cleaning, polish all appliances, clean up dust and debis, and sweep all floors. Finally, you are ready to debut your newly renovated modern kitchen. Below I added a short video that might give you renovation ideas.
Thank You


This article on DIY kitchen remodeling provides a comprehensive guide for homeowners looking to undertake a project themselves. The step-by-step breakdown and practical tips make it accessible for beginners, emphasizing cost-effectiveness and personalization. Incorporating trends like modular kitchen Chennai into the discussion would enhance its relevance, showcasing how adaptable design concepts can be integrated into any DIY project. I appreciate how the article balances inspiration with practical advice, making it a valuable resource for anyone considering a kitchen makeover. I look forward to more insightful posts like this!
ReplyDeleteYou can easily do it yourself
DeleteThis comment has been removed by the author.
ReplyDeleteThe design and planning stage of your kitchen renovation is where your ideas begin to take shape. From layout to materials, every detail matters in creating a functional and visually appealing space. By using My Home Handyman, a qualified kitchen interior designer and professional contractor, you can make a huge difference in your kitchen renovation process.
ReplyDelete